Saturday, February 25, 2012

Oreo-stuffed chocolate chip cookies. Yup.

It's been a while and I apologize, but I've had a miserable cold-and-fever combo — today I left the house for the first time in four days. When I clear the cloud out of my head long enough to remember to eat, I've been resorting to soup and frozen food, so I haven't been cooking a lot lately, and certainly nothing fancy.

I did make some of my favorite gift cookies for my coworkers last week, so I'll tell you about these today instead of giving you more details of my cooped-up life. In writing up these marvelous cookies, I realized that I tend to make a lot of really, really unhealthy food. Not quite as bad as Epic Meal Time, but if my boyfriend hangs around much longer, he's going to go the way of Paula Deen and get Type II diabetes.

In any case, you guys are going to want to hang around to see this recipe, if only to bookmark it and use it later as a birthday/holiday/just-because present. I've used them to pay my friends for helping me move, I've given my brother a batch for his birthday (he ate 20 for lunch. I'm still surprised he didn't keel over and die instantly), and I've made friends simply by offering them this cookie.

Now, I give this power to you.

Cream butter and brown and white sugar. We're all friends here.


Usually I advocate omitting the white sugar for just brown sugar, but in this case there's a good reason to use white sugar: We need the dough to not spread out too much.

Add eggs and vanilla and beat some more until mixed. In a separate bowl, mix flour, baking powder, and salt, and slowly add the dry ingredients to the butter and sugar mess.

I love my mixer so so much.
Add chocolate chips when the dough is mixed, and then pull out double-stuffed Oreos (or off-brand version thereof). Scoop a little over a tablespoon of dough and stick it to the bottom of the cookie, put another tablespoon of dough on top, and mush it around until it encases the entire Oreo in dough. The chocolate chips will tend to cluster at the top and bottom, not the sides because it's difficult to keep the chocolate chips there without a lot of cookie dough. Don't worry about this.

Try to keep most of the dough on the top or bottom so as the cookies bake, the dough doesn't spread out too much. At the same time, you don't want to put too little dough on the Oreo because it ruin the surprise and the the Oreo creme center will spill out onto the parchment.


Bake them in a 350 degree oven for about 13 minutes. Watch them very carefully because they can bake for less time depending on the oven. (If you overbake them, they'll just demand to be dipped in milk even more!)


It's really best to eat these cookies warm. If you're sharing, bring these cookies to wherever they're going without telling anyone what they are: When your friends bite into them, it will induce squealing or gasps of awe. My company even posted about them on our Twitter page.

Side note: I've made these cookies with peanut butter-filled Oreos and I highly recommend this method. I also encourage you to experiment: Oreo keeps coming out with more and more flavors, so the possibilities are getting more and more endless. Personally, I'd like to try using Double Triple Oreos, but honestly, I'm not ready to make my peace with the universe and have a heart attack quite yet.

My attempt at an artsy-fartsy shot. Not terrible, needs work.
Enjoy the cookies! Without further ado, here's the recipe:

Ingredients:
2 sticks butter, softened
¾ cup packed brown sugar
1 cup white sugar
2 large eggs
1 tablespoon vanilla extract
3 ½ cups all-purpose flour
1 teaspoon salt
1 teaspoon baking soda
10 ounces semi-sweet chocolate chips (1 ½ cups)
1 package Oreo cookies (double stuff)


To make:
1. Preheat oven to 350 degrees.
2. In the bowl of a stand mixer, cream together the butter and sugars. Add in the eggs and vanilla and mix until well combined.
3. In a separate bowl, mix the flour, baking soda, and salt.
4. Slowly add to the wet mixture and combine thoroughly.
5. Stir in the chocolate chips.
6. Chill the dough for 15 minutes to make it easier to work with and to keep the dough from spreading when baking.
7. Using a cookie scoop place one scoop of dough on top of an Oreo cookie. Place another single scoop on the bottom of the Oreo to create a cookie sandwich. Seal the edges together to completely close in the Oreo.
8. Place the balls of cookie dough on a parchment lined baking sheet and bake for 10 to 13 minutes.
9. Let cool for 5 minutes and then transfer to a wire rack.

Monday, February 13, 2012

The world sends a valentine to dorks

I know I've said how I'm really not a fan of Valentine's Day, and now that I've posted twice about it I'm sure you're pretty convinced I actually like it. But I don't. I think it's contrived. But then the world went and made everything adorable.


NPR made a series of absurdly awesome valentines (available for the public to download here). I like the designs they've used, I love NPR, and I love puns. These are amazing. I love them.

The California Academy of Sciences asked its visitors to make valentines (on recyclable, non-toxic paper, of course) for its African penguins. There are pictures of them taking the valentines from their keepers and bringing them to nest. Again, adorbs.


And last but not least, it looks like Fox is going to air a comedy about a man who must take a job as a radio host at a NPR station. In essence, as @NPRNews gleefully tweeted, a NPR sitcom! I'm so excited. I just have to hope it's quality stuff.

So those are my reports. Sure, I've got a midterm tomorrow, but this is what's making me happy tonight as I try and study, and I hope it makes you happy too!

Sunday, February 12, 2012

Blog challenge: Manly Valentine's Day gifts


My dear friend and fellow blogger Autumn and I have decided to set a monthly challenge for ourselves. It will change every month and you'll get two solutions to a single problem.


Blog challenge for the month of February? Manly Valentine's Day presents. We both have significant others that are more Barney Stinson and less Ted Mosby, so a touchy-feely holiday like Valentine's Day can be ridiculously challenging.

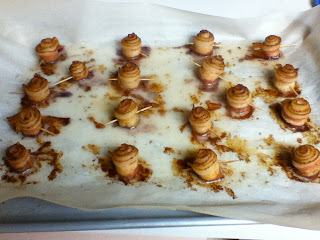
My solution? Bacon roses. Yes, you read that right: Now you can give your significant other edible roses in something other than chocolate. (If you're an observant Jew, Muslim, or vegetarian, I'm sure you can use the same system and replace the bacon with fake bacon from Morningstar or Smart Bacon. Adjust oven temperatures appropriately.) Even better? This project is absurdly easy. Really. The entire thing took half an hour (excluding cooking time) and I never once felt it was complicated.

Smiles are a guaranteed result!
My roommate helped me out and made her own bouquet to give her beau. I love having help in the kitchen, and she loved the solution to her own Valentine's Day quandary.

To get started, you'll need a pack of bacon, barbeque skewers, toothpicks, paper towels, parchment paper, a baking sheet, paper and scissors, a vase, and green gardening tape. I used plain bacon; my roommate used smoked bacon and both worked well.


Preheat the oven to 375 degrees, and line a baking sheet with parchment paper. Roll the strips of bacon into little rosebuds. They look best if you roll on a slight diagonal, so the edge always shows. This makes them into a bacon spiral and gives them their rosebud appearance.

Stick a toothpick through the side of the rosebud and set it down on its bottom, squishing it down a little bit so they become a bit squat. Do this to as many slices of bacon as you want.


Pop these in the oven for about 30 minutes. In the mean time, prep your barbeque skewers by covering them in gardening tape and attaching paper leaves if you want.


I left a little less than an inch on the pointy end of the skewers because I wasn't sure it was a good idea to put the garden tape into the bacon. I free-handed some leaves and taped them to a few of the skewers. I also made some of the skewers shorter than others to give the bouquet a bit of variety.

The bacon was done when I pulled it out of the oven. I let it cool a bit so I didn't burn my fingers.

Ew.
From here, everything was simple. I pulled the toothpick out of the rose, patted some of the grease off with a paper towel, and stuck the skewer in the middle. I had to finagle some skewering to make sure the bacon stayed on top of the skewer, but most were problem-free.

When I was done I placed the roses in a vase and tied a ribbon around it, then delivered it to my boyfriend, who was pretty delighted with the entire thing. So now my kitchen smells like bacon, his house smells like bacon, and everyone's happy.

Om nom nom.
I seriously cannot recommend this enough. It's super duper simple and it's very easy to make it look good. Aaaaaand it's absolutely adorable and yet somehow, manly.

Oh, and Autumn? Game on!

Wednesday, February 8, 2012

Fun with embroidery floss!

Over the past few weeks I've done a couple of projects with embroidery floss, a medium I haven't used in a while. One was an embroidery project, and the other was a little different — I wrapped my earbuds with embroidery floss, camp-style.

I was inspired by a post on Pinterest, my latest obsession (and the new darling of social media fans). I wrapped mine in rainbow colors, and I tried to get muted colors. This way I can pretend to be an adult while still having a rainbow on me while I listen to NPR.


I'm not quite sure if I'm done yet — I think I want to wrap it all the way up to the top of the cord. While I was doing this one of my roommate got into it and wrapped her own earbud cords. Cos she's super cute, here's a picture of her using them:
She was rather bemused by my silly picture-taking attempts.
I know, you're all excited. I'll show you how to do this for yourself later in this entry. But first, I want to show off a project I made for my dear friend Autumn and her hubby Rob:
Rob is quite tall... Autumn, not so much. :)
For the embroidery I just used a standard embroidery hoop and two colors of embroidery floss. The fabric is plain muslin (much like our current president!). And those cute little crane scissors? My mom got them for me. They're great for sewing projects like this because they're sharp and I can get them close to what I want to cut.


I put the fabric in the hoop and drew what I was going to embroider with a pencil — my standard procedure. (Don't use a mechanical pencil, they're too pointed and will just punch through the fabric.)


I used a back stitch all along the lines and letters, did a French knot for the eyes, and modified the back stitch to fill in the heart.

When I was done, I trimmed the edges and glued them down to the back of the hoop so the fabric wouldn't slip over time. I also brushed glue on top, hoping to sort of decoupage the fabric to the hoop for the same purpose.


Now for the earbuds! I started just tying an overhand knot and adding a little bit of tacky glue to hold the embroidery floss in place. (I did this periodically along the cord. I don't know if it helps keep everything down, but it certainly reassured me.) I continued to tie overhand knots going one direction to make a spiral.


1. Forming a backward P, place the thread across the cord.
2. Run the thread under the cord and through the loop from step 1.
3. Turn the loop by pulling on the free end.
4. Pull tight on the free end and cinch the knot to complete the step.
5. Start from step 1!

When I ran out of embroidery floss I just started with a new piece, tucking the remnants of the old thread under the knots so there were no loose ends. With every new piece there was about a half an inch from the other side of the knot, and I just tucked that under along with the remnant of the previous thread.

To finish off, I tied a very tight surgeon's knot and trimmed the end as close to the cord as I could get it. I coated the last half inch or so of the cord in tacky glue before I tied my overhand knots so the embroidery floss would have something to hold onto without getting glue all over the outside of my newly-wrapped earbud cords.

I was inspired to make these by a user named ada(: (again, on Pinterest). I hope these two projects inspire you as well! It felt good to use embroidery floss again.

Monday, February 6, 2012

Superbowl pretzel experiment

I know the Superbowl has come and gone, but yesterday I made soft pretzel balls for the game at the fraternity. They were gone in about 10 minutes, and they're super tasty with Dijon mustard.

I combined two recipes, one from Alton Brown at the Food Network and the other from Maria at Two Peas and Their Pod. I had no idea what I was doing, but I jumped in headfirst. Pretzels are delicious and I was excited! Luckily the recipe is a bit hurry-up-and-wait, so I had lots of time to review the instructions. This is the first time I've boiled something before baking it, and I have to admit it was pretty epic to stand over a vat (okay, a pot) of boiling water with massive amounts of steam coming off of it like the wizard in Fantasia. (I have a very active imagination. It's great fun.)

First step was mixing sugar, salt, and yeast in a bowl with warm water. This is familiar territory for me: The sugar is to feed the yeast, the salt impairs its growth a little, and the water wakes it up. I've killed yeast before, so I'm always very careful.
Very careful.
The water was a little warm at 120 degrees Farenheit, so I let it cool for about a minute so the water didn't kill the yeast. I let it sit for about five minutes until the yeast woke up and started bubbling up little bits of oxygen, like so:
It also smells a little like feet. Hooray, it's ready!
I mixed in the flour with a dough hook and my standing mixer and kneaded it briefly until it was smooth and satiny. I rolled it in olive oil then left it to rise for an hour.
It's like magic. Or science. (It's science.)
Once it rose, I split the dough into 8 balls and rolled each one out into a snake. At first I tried to make them into pretzel shapes, but couldn't for the life of me figure out how to do that, so I just cut them into little bite-size pieces.

And then, things got weird. These little bits were boiled in water and baking soda for about 30 seconds, then plopped them down on a cookie sheet covered in parchment paper. The baking soda got everywhere as I was transferring, but hey, it's a cleaning agent, so it's all safe and good for the kitchen and the pot. The boiling changed the color of the dough, and I think it helps pre-cook the inside of the pretzels so you can bake them without making the crust hard.


Then I took an egg wash (one egg and a tablespoon of water), brushed the top of the pretzel bites and then sprinkled them with salt. The first batch I foolishly used plain salt and they tasted caustic. Second batch? Perfectly seasoned because I used coarse Kosher salt. The salted bites baked for 12 minutes.
Left is baked, right is unbaked but boiled.
Results? Next time I'm going to let them bake a little longer — I was concerned I was going to overbake them and get rock-hard dough balls. Next time I also want to get the water to more of a rolling boil, so I might use a smaller pan — or even a pot — to boil the pretzels in. And of course, next time I'll start out using coarse salt.

There definitely will be a next-time: These were absolutely delicious! I love trying new recipes, and even if I didn't quite nail this one, I think I learned a valuable lesson (again) about following directions properly the first time I make something.

BONUS: Okay, so I love LEGO and Lord of the Rings, and maybe I've gotten carried away, but the company recently released posters with all the characters, and someone snapped an illicit shot of the sets that will be released sometime in the summer — hopefully before my birthday!

Thursday, February 2, 2012

A little self-control

I'm not even halfway through the quarter and I already feel behind. True, I'm only taking two classes, but  13 hours at my paid job and an out-of-town internship three days a week have me in the mood for nothing more than episodes of Voyager and scarfing junk food. (Extra significant because I've now seen every episode of Voyager. Bah.)

I googled "frustrated woman." I love stock images so much.
I recently re-read an interview I heard in the first week of the year on Marketplace with a financial planner who links loosing weight to controlling finances. The basic necessities are the same: You need self-control, planning, and good motivation. The trip-ups can be similar — a cute top at a high price can be just as tempting as a plate of cookies.

I've got the opposite problem — I have issues keeping weight on rather than keeping it off — but I think the basic suggestions are useful for a lot of what I'm trying to cope with, including my scholastic procrastination. The idea is to do the small, routine things necessary to achieve your goal while taking breaks to give yourself a chance to recover. The way the financial planner explains it, willpower "operates like a muscle in that if you use it a lot at one point, it'll tire itself out." So while we need breaks (we need to splurge or grab a slice of cake), we're also "gradually building up" our willpower.

I really like this analogy. What I like even more is that it defeats one of my classic procrastination techniques: After a surge of productivity, I tend to reward myself too much and take too long of a break. But as Brokamp says, "a period of going very extreme for a while will show you enough progress to provide the motivation you need to keep going." Seeing results will give you a glimpse of your goal, and that will give you the help you need to get there. So after pushing myself harder, I'll be closer to my goal and want it even more, rather than feeling like I can slack off.

In the next few months, I'll be working toward the mental spot Brokamp describes: When you encounter a challenge to your goal, "hopefully you've made so much progress that you don't want to give it all back, so that time when [...] you say, 'OK I just did this one little slip-up,' but now I'm going to get back to habits that are healthier for me physically and financially.

Because this was such a serious post, here's a picture of an adorable, adoptable puppy my roommate took. Enjoy!
He peed on the background after the picture was taken. And I still want him.