Tuesday, November 29, 2011

Open life/food

I was chatting with my mentor recently about blogging. So many blogs seem to have a single purpose: crafts, child-rearing, cooking or baking, dieting, fashion, politics. Then there are those that do a combination, but still seem coherent. It's this coherence that I'm struggling with.

With everything we all do in our lives, it's hard to squeeze out a connecting thread. I work, I hang out with different groups of friends, I talk to both sides of my family, and I'm taking classes in three different departments. I bake and I cook, but sometimes it's just to eat and sometimes it's just for fun.

My mentor is running a similar blog to mine, and she's called her's an "open food/life journal." I like it. I like a lot of things she does, but there are a lot of other great things that are "open" out there. A lot of wonderful sites on the internet are open source, meaning anyone can edit, support, and contribute to structure of the site. An author and researcher named Brené Brown urges readers to embrace "wholehearted living," meaning you have to open yourself to every emotion and person who walks into your life. The office I work in was recently remodeled and expanded to reflect a more open structure.

I started my blog to help open channels in my writers' block and flex and build my feeble writing muscles. Despite my instincts, I won't try and put this blog in a niche. As I try to live my life in a more open way, I'll record it in my open life/food journal here.

Speaking of continual blogging, here's a preview of posts that are coming soon:

Sunday, November 27, 2011

Buttermilk blueberry breakfast

I've been trying to be better about eating breakfast, but my desire to get up in the mornings is actually less than zero at this point, so I don't have time to make any kind of elaborate breakfast. My stroke of genius (while standing in the grocery store) earlier today was to make muffins that I can grab on my way out the door. Brilliant!

I don't normally have buttermilk in the house, but I happened to have some left over from baking for Thanksgiving, so I used it and made buttermilk blueberry muffins. Here goes!

Next time I need to add a little vanilla, but these turned out delicious — they're quite light and because I used fresh blueberries, the fruit literally exploded all over the place, and it tastes delicious. I'm having a hard time saving these for breakfast.

First thing's first: beat one egg (just one!), then add buttermilk and vegetable oil.
Mix those up, then add the rest of the ingredients (sugar, flour, butter, baking powder, baking soda, and salt). Again, I've split the flour and done part all-purpose and part whole wheat, but that's far from necessary.
Mix it all up until it's lumpy, but everything is moist. I had to add about two extra tablespoons of buttermilk to get it to the right consistency (it was too dry at first).
... and then add a cup of blueberries! Make sure to pull off the stems if there are any.
Carefully stir the blueberries in — don't beat the batter too much or it won't turn out properly. Use a quarter-cup measure to scoop the batter into greased muffin cups.
Bake at 400F for 20 minutes, or until gorgeously golden brown. Use a knife to pop them out of the muffin cups almost immediately — the muffins will continue to bake in the cups, and by this point they will be perfectly brown all around. Any longer and they'll begin to burn.
Yum. I can't wait for breakfast tomorrow!!

Here's the complete recipe, for those following along at home:
Buttermilk blueberry muffins
1 egg
3/4 cup buttermilk
1/2 cup vegetable oil
2 cups flour (1 cup all-purpose, 1 cup whole wheat)
1/3 cup brown sugar
2 teaspoons baking powder
1/2 teaspoon baking soda
1 teaspoon salt
1 cup blueberries

1. Heat oven to 400F.
2. Beat egg.
3. Stir in milk and oil.
4. Stir in remaining ingredients all at once, and stop when the flour is moistened and the batter is lumpy. Add a little more milk if the batter is too dry and not all combined.
5. Stir in blueberries.
6. Grease muffin cups and fill them.
7. Bake for about 20 minutes, or until golden brown.

Monday, November 21, 2011

Say it, don't spray it

I'm a UC Davis student, but not a protester. Suddenly, everyone in the world has heard the name UC Davis, and for once, they're not associating it with cows. It's strange.

On Tuesday there was a student-led strike to protest fee hikes (mostly), culminating in students occupying Mrak Hall, the main administrative building. They were kicked out on Thursday, so protesters moved to camp out on the quad. Chancellor Katehi allowed them to pitch their tents and stay there... until she changed her mind, and on Friday afternoon, when she told the police to clear the protesters out. Instead, the students sat down, the police felt threatened, then Lt. Pike pepper sprayed the students sitting on the ground as they tried to shield themselves. Five people were arrested, and some complain they weren't treated for their wounds. On Saturday, Katehi gave a very brief press conference defending her own leadership, and then she left, and everyone stared at her in silence to avoid any appearance of violence.

We're in the technology age, so everyone was filming and photographing. I heard about it by the end of the day, despite being at work in another city all day. The internet has even turned the picture of Lt. Pike pepper spraying students as casually as one sprays Raid onto bugs into a meme. And these pictures brought the blinding light of the media down on the violence of the UC Davis police.

But let's be clear: The student body at UC Davis has been spoiling for a fight for years, and it's only increased after police in Berkeley were filmed beating students with night sticks at a protest. The students have been demonstrating peacefully, but they've been toeing the line, trying to see when the police will push back and they can get media attention.

Protesters keep calling for dialogue, but whenever Katehi stands up to talk, the protesters dismiss her as inept, corrupt, or a mouthpiece. They don't actually want a real dialogue -- they just want the administration to shut up and listen. I know the feeling; I'm working hard to get two degrees in four years, I've worked since I started college, and I'm disgusted by the large payrolls of administrators.

But I'm not going to say I'm on the side of protesters. By sticking their fingers in their ears whenever administrators try to talk, they're ignoring basic facts. Some protesters demand "education should be free," an impossibility in a state as large as California. Others demand the resignation of Katehi, even though this would cost thousands and thousands of dollars in the long-run, because UC Davis would have to hire another chancellor mid-year, and offer a large and enticing moving bonus (Katehi got a 27 percent pay increase over Larry Vanderhoef, the previous chancellor, plus benefits). To bring Katehi here, UC Davis offered a "generous compensation package that includes a $100,000 relocation allowance, free housing, a $9,000 annual automobile allowance, a generous health and pension package, a low-interest home loan and a faculty position when she ends her service as chancellor" according to Oliver Richards. The university is going to face even further cuts (especially with the eventual sequestration at the national and state level), and the last thing we need is to add more costs to the university.

Students are calling for a strike on Monday, and I don't think I'll be joining them — my education costs way too much, and I need my paycheck. Hopefully they won't repeat their past and march through the library yelling, pulling fire alarms in lecture halls, and shouting at fellow students, trying to force them to join the strike. Because I refuse to be forced to believe anything, even if it's for my supposed benefit.

Here's a collection of good stories I've read about the protests, the pepper spraying, and the Occupy movement in general from people who know way more than I do:

    Oh, and for the record, the title of this post ("Say it, don't spray it") comes from a protester's sign I saw on the quad today.

    Wednesday, November 16, 2011

    D'oh!

    No crafty recipes nor political manifestos (manifestoes? manifestii?) from me tonight; just a simple reminder.

    I've been toying with bracelets made from leather cording and had some success with wrapping beads in leather cord. (It's not too childish if you're still in college and give your mom handmade bracelets from Christmas, right? Right.) So I got all enthusiastic and thought I could use the same technique using sheer ribbon and glass pearls. So two nights ago I went out and bought some, thinking myself to be terribly clever.

    I was really excited to start my project, and really proud that I had come up with such a cute gift idea so far ahead of Christmas. Proud, that is, until I realized the holes in the beads were too small for the ribbon to fit through. Sigh.

    And so tonight, ladies and gentlemen, I'd like to remind you all to measure twice, cut once. Or else you'll end up like I no doubt will: Using your parents' garage over Thanksgiving break to drill larger holes in beads with an awl and trying to ignore your relatives' snickers. Don't end up like me. Make sure the tools you're using fit the task — and fit each other.

    Monday, November 14, 2011

    Return of the pesto bread

    A week ago I wrote about my deep love of pesto, my failed attempt at making pesto bread, and how much I hate failing. When I fail at something, I have to keep trying at it until I give up or succeed. Tonight, I made my third attempt at bread, and this time I succeeded, with delicious, delicious results.

    I knew the bread would at least rise after I mixed the yeast with warm milk and sugar. I microwaved the milk and used a candy thermometer to make sure it was 110°ish Farenheit. This is what the recipe suggested and in keeping with what the Internet seemed to agree on. It seems pretty obsessive to measure the temperature of the milk, and normally I wouldn't, but I really wanted the bread to turn out right.

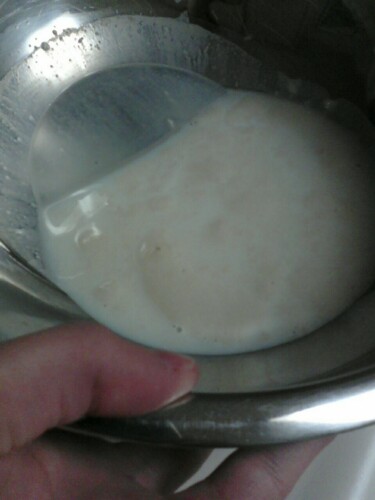
    As you can sort of see in the picture, the yeast became kind of chunky and had a few bubbles in it after sitting for a little under ten minutes. It smelled kind of funny, and that's how I knew it was ready. This time I woke the yeast up without killing it. On to the next step!

    I added the olive oil and salt and whisked it. I think I used too much salt and will probably use less next time. Then I added  flour by the half cup and mixed with a wooden spoon. I used half whole wheat flour and half all-purpose flour: I like using some whole wheat flour in recipes because I think it adds extra texture and flavor.
    I kneaded in the last half cup of flour, making sure to turn the dough around as I kneaded to guarantee it was well-mixed.

    (As a side note, kneading dough is one of my favorite parts of baking. I used to beg my mom to let me do it, and usually she would let me have at it, at least until she needed to get a move on and properly knead it. I was not a strong child. Also, kneading dough is about the best salve for an angry mood that I can think of. It's all about punching things. And then you get bread!)

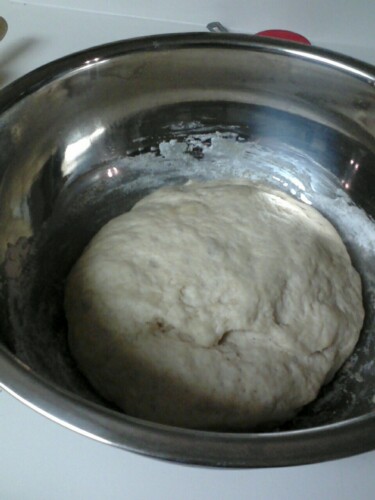
    After the flour was incorporated I rolled it in a little olive oil, threw it in a bowl, covered it with plastic wrap, and went to Michael's for craft supplies with my roommates. (Lots of homemade Christmas presents in the works, which means lots of blog material for me. Phew!) When I came back, the dough had at least doubled in size.


    Success! Since the dough had risen this time, I rolled it out on a floured countertop in an approximately rectangular shape and spread about a third of a cup of pre-made pesto sauce over the dough. (I used Trader Joe's Genovese pesto — if I had basil I would've made my own!) I can never say no to pine nuts/pinolis, so I sprinkled a handful of those on top as well. I covered this mix with about a half cup of parmesan cheese.
    I folded the edges in then rolled the dough up like a jelly roll cake. I decided not to try and braid it like the recipe suggests, so I put it straight in a bread pan. I sprinkled a little parmesan on top for decoration.
    I covered the bread and waited for about an hour to let it rise again while I went and ate dinner and watched an episode of Voyager and convinced my housemate that no one we know will die of Type 2 diabetes (unless, of course, they continue to eat what I'm cooking, but I left that part out).
    When it rose back up I put it in the oven and baked for just barely under half an hour — the top was turning golden brown and I didn't want to crisp it. I put it on a metal rack to help it cool, and after about 45 minutes I dumped it out of the pan and sliced into it.


    Delicious! And it's pretty attractive to look at, too!

    End thoughts?
    • I need to be cautious when working with yeast.
    • Bread takes a lot of time. I was doing other things, but from start to the time I bit into it was probably about four hours. An oven is no bread machine, and I need to remember that.
    • I need to watch my salt content. I think I added too much salt in the beginning, and next time I will add less salt, and probably less olive oil, especially since there's so much in both pesto and the parmesan.
    • Next time I'll try braiding the bread so it's more of a pull-apart style, and maybe using mozzarella cheese instead of parmesan.
    • I'm really bad at photographing food. (But I'll get better!)
    Here's the recipe, for those few following along at home. I wrote this one down a long time ago and don't know the source, but I certainly didn't invent it myself. Enjoy!
    Pesto Bread
    Ingredients:
    Dough:                                             Filling:
    1 cup warm milk                              1/3 cup pesto
    2 tablespoons olive oil                      1/2 cup grated parmesan
    1 tablespoon sugar
    1/2 tablespoon salt
    1/2 tablespoon dry active yeast
    2 1/2 to 3 cups flour
      1. In a large bowl, combine warm milk, yeast, and sugar. Let sit for 10 minutes.
      2. Add the olive oil and salt.
      3. Add in a cup of flour and beat with a wooden spoon until smooth. Add in another cup of flour and do the same.
      4. Sprinkle a half cup of flour onto a flat surface and pour out the dough on top. Begin to knead and slowly add in more flour until the dough no longer sticks to the table. This will take about eight to 10 minutes of kneading.
      5. Add a little olive oil to a large bowl (about a tablespoon). Place the kneaded dough into the bowl and turn over a few times to lightly coat all sides of the dough.
      6. Cover with plastic wrap and allow to rest for an hour or until doubled in bulk.
      7. Pour out the dough onto a very lightly floured surface. Roll it out to a 9 by 14 inch rectangle.
      8. Spread the pesto on top of the dough and sprinkle the parmesan cheese on top.
      9. Bring in the side by a half inch and then roll the dough like a jelly roll.
      10. Pinch the seam closed. Take a sharp knife and cut the dough down the center length-wise, splitting the log in half.
      11. Open the roll exposing the inside of the roll. Take the two cut pieces and braid them together with the cut side always facing up.
      12. Place the bread into a greased bread pan. Cover the dough with plastic wrap and allow to rest for an hour or until double in bulk.
      13. Sprinkle the top with more parmesan cheese and place into a preheated 375F oven for 30 to 35 minutes.
      14. Check the bread about 10 minutes before it's finished to see if you need to cover with tin foil if they are getting too brown.
      15. Remove from oven and allow to cool on a wire rack.

        Thursday, November 10, 2011

        #mencallmethings but I don't care

        I have a large soft spot in my heart for Jezebel, which calls itself a website for women but has such a marvelously "fuck you" attitude that I forgive it for its pinkish-red text. And they've done it once again.

        Lately, the hashtag #mencallmethings has been trending on Twitter since November 8th as a way for women to talk back to the sexism they encounter every day by tweeting the ways people use gender as an insult. Sady Doyle, a feminist blogger at Tiger Beatdown, started the hashtag, and has an amazing round-up of the results she's seen so far here, breaking them down into seven themes, including the idea that women are weaker, that if you're a feminist you're also a Nazi, anarchist, Stalinist, [insert radical political position here], and that all women are "stupid little girl[s]." The tweets are actually pretty entertaining and thought-provoking, and you can look at a list here.

        Jezebel's staff took the results of this hashtag and wrote an article called "Misogynist Insults Would Make Awesome Band Names," complete with great descriptions of the bands. I absolutely love it. While it's important to open up the world of the genders and share our experiences so we understand what other people are going through, I think the best way to take all the insults we hear through the day and just laugh them off. There is a time and a place for education. It's important to try and help people understand that certain phrases and words are hurtful, hateful, and unacceptable, but when people make off-the-cuff insults (like most of the ones cited in #mencallmethings), the best thing to do is laugh, and deny them control over our emotions.

        Misogynists like to think they run the world. The one thing women (and men) can always have control over is how they react — or don't. We shouldn't let misogynists hurt us, because they can't. That power is more important than anything the patriarchy can hold over anyone who dares to stand up to them.

        Monday, November 7, 2011

        A success and a failure

        First, the failure.
        Tonight, I tried to make pesto bread. It would've been awesome. I adore pesto, and the bread is essentially a basic bread, rolled out and covered in pesto, then braided, put in a pan, doused with parmesan, and baked. Yum!

        But alas, the dough never rose, even after trying with a second batch. Roommate said I should wait three days, and (after a lot of laughing) explained that after three days, Jesus rose from the grave, and maybe I should be a little more patient. I would honestly be really freaked out if I gave rise to holy bread, so I'll just stick with the "I'm a failure as a baker" idea.

        My current (non-supernatural) theories hypotheses on why the bread didn't rise are as follows:
        • The yeast was expired. There was no date on the yeast and one of my roommates just had the packet sitting around. When I try again, I'll try and get fresh yeast.
        • The milk was too hot and I killed the yeast (for the first time), or the milk wasn't warm enough and the yeast didn't wake up (for the second time around).
        This is my first attempt at making anything with yeast, and now I'm reminded why I was so intimidated by it. I'm determined not to be scared off, so once I bulk up on baking supplies, I'll return armed with fresh yeast and a candy thermometer to make sure whatever I'm soaking the yeast in is neither too hot nor too cold.

        Second, the success.
        My boyfriend is in a fraternity on campus, and they always assign pledges a "big brother" to help them through the process. Boyfriend got a little brother, which means I have yet another person to make fat with my efforts. The little brother's favorite kind of cookie is snickerdoodle, and I was pretty excited to make them because I've never made them before on my own.

        I used the basic Betty Crocker recipe for snickerdoodle (you can find it here if you don't have a cookbook), but ended up improvising a bit. I ran out of white sugar, so I used about a third of a cup of brown sugar and a third of a cup of powdered sugar in the actual cookies. I'm a big fan of using brown sugar in everything — it makes it softer, chewier, and (in my opinion) tastier, and to my relief it turned out nicely. I also used powdered sugar for the cookie coating, and it worked like a charm.

        Honestly, the only problem with this recipe is that it only makes two dozen cookies, and that is nowhere near enough! It is important to note that the recipe calls for both butter and shortening, and you do need cream of tartar, something I didn't have but one of my housemates did. Hooray for Housemate!

        Even if I couldn't figure out how to deal with yeast, I'm really happy the snickerdoodle turned out properly. I really don't like messing things up, especially when I'm baking. I forget that there are some things I just can't do, so while it's good to get a reminder, it's not exactly fun. Knowing how to fix the problem next time helps take the sting out of failure. And snickerdoodles definitely help!

        Saturday, November 5, 2011

        The most luxurious cake ever made

        I was supposed to go home today, but after a rough night thanks to some sort of bug, I decided to stay home and rest. I keep forgetting that even if it's the weekend, I need to rest up if I've had a long week at school. Sure, I'm not running marathons, but midterms and papers take it out of you.

        Well, I stayed at home and got bored, so I decided to continue on my quest to make my roommates fat. I made Guinness chocolate cake with Bailey's ganache and Bailey's buttercream frosting. The recipe comes from Annie's Eats, and she makes them as cupcakes, but I've become lazy lately and refuse to make cupcakes. One cake is so much easier!

        I love making this recipe. You start out by melting the butter, adding a cup of Guinness (or other stout), and simmering it in a saucepan. When the butter is melted, you add three quarters of a cup of unsweetened cocoa powder and stir until the entire kitchen smells delicious. Somehow the beer deepens the taste of the chocolate, giving it a little bitterness that makes it so scrumptious.

        Again, this is supposed to be a cupcake recipe, but I just put the batter into two 9-inch pans. I also usually put chocolate chips in the batter because they're extra tasty, but I forgot to add them before I poured the batter in, so I threw them on top, hoping they would sink down as they cooked. (They didn't but that's fine.)

        This is also the first time I've successfully made ganache. I tried to make it a while ago but it didn't turn out properly. (Perhaps I should've heeded the directions at the time.) So I was a little cautious about trying the ganache — every other time I've used this recipe, I skipped the ganache because it seemed like a pain. But I had time to kill so I went for it. It was pretty simple: just heated the cream until it was simmering, poured it over the chocolate, let it sit, then stirred. I added the butter and Bailey's, then stirred a lot until it was smooth. Pretty sure it could've used more stirring, but that's okay. When the cakes had cooled, I poured the ganache in the middle and it looked like a hamburger. A delicious, chocolatey burger.

        This may or may not have been a mistake. The ganache wasn't cool enough and the top cake layer rapidly started sliding around on top of the ganache, so we stuck it in the freezer and crossed our fingers. It worked pretty well.

        While the freezer was busy fixing my mistakes, I made the frosting. Now technically, the recipe has directions for making frosting, but I just kind of went for it. I used almost two sticks of butter and a lot of powdered sugar. I also added two tablespoons of milk (I was all out of cream by the time I got to the frosting since I used it all in the ganache, but I normally use cream for frosting), a tablespoon of vanilla, and about four tablespoons of Bailey's.

        It's freaking delicious. The ganache is gooey, the cake is supremely rich, and the frosting is tasty but not too strong. I'm in love. It might not look very pretty (the ganache didn't stay together very well, and the frosting's a little messy), but it all looks the same once it's in your mouth! The way this tastes, it won't stay on the plate for long.

        Wednesday, November 2, 2011

        Cookies vs. sociology

        In a (successful) effort to not write my sociology paper, I made oatmeal raisin cookies.

        I love making my own cookies. I love baking in general, but there's something so special about wanting that soft, chewy, just-sugary-enough treat and then going and making it yourself.

        I was lucky enough to grow up in a family that cooks. (My roommates and friends are not so lucky, because they have to/get to eat all the treats I make. I will make all of them fat.) My family is a big believer in making a lot of things from scratch: cookies, tomato sauce, pizza dough, and pancakes. In fact, I was so spoiled growing up that I still don't trust in-the-box pancake mixes. It makes me sort of a snob, but I don't mind so much because from-scratch pancakes are delicious. And so are from-scratch oatmeal raisin cookies, which is where I was going with this.

        One more statement, and then I'll give you the recipe: I'm taking it as a sign of growth that I can trouble-shoot very basic problems with my baking. Tonight's cookies, for instance, needed a bit more cinnamon and maybe some nutmeg. I don't have to follow recipes to the letter, and I think that's good. Next goal is to be able to recognize what baking powder and baking soda do... To Wikipedia with me!


        Oatmeal raisin cookies
        1 cup butter, softened (2 sticks)
        1¼ cups firmly packed brown sugar
        ½ cup granulated sugar
        2 eggs
        2 teaspoons vanilla
        1 teaspoon baking soda
        1¾ cups flour
        1 teaspoon ground cinnamon
        ½ teaspoon salt (optional)
        2½ cups rolled oats
        1 cup raisins (or 2 cups chocolate chips, or 1 cup of each — the last idea is the best idea)

        1. Heat oven to 375°F.
        2. Beat butter and sugars until creamy.
        3. Add eggs, milk, and vanilla. Mix.
        4. Add flour, baking soda, and salt. Mix.
        5. Stir in oats, raisins (or chocolate chips). Mix until everything is incorporated.
        6. Scoop up a generous tablespoon of dough and drop it onto a cookie sheet with parchment paper.
        7. Bake 9 to 10 minutes. This is the official time, but I usually leave it in for a little bit longer — until the center of the cookies don't look wet.
        8. Cool for 1 minute on a cookie sheet, then remove to a wire rack. Cool completely.
        9. Swat away hands as they try and take your precious cookies.


        P.S. When Roommate returns with her fancy camera, I'll have fancy pictures. Until then, it's cell phone pictures for me!